

How to zoom in capcut on pc. If you’re looking to enhance your video editing skills, learning how to zoom in CapCut on PC can add a dynamic touch to your projects. This easy step-by-step guide will walk you through the process, whether you’re a beginner or an experienced editor.
With just a few simple adjustments, you can create captivating zoom effects that draw your audience’s attention and elevate your content. Get ready to transform your videos and make them stand out with this straightforward approach to zooming in CapCut!
Table of Contents
Open CapCut on PC
Start by launching the CapCut application on your computer. Double-click the CapCut icon on your desktop or find it in your start menu. Once the app is open, you’ll be greeted by the user-friendly interface. This is where all your editing magic will happen.
If you haven’t installed CapCut yet, download it from the official website first. The installation process is quick and straightforward, so you’ll be ready to start editing in no time. Now that CapCut is open, you’re ready to move on to the next step: importing your media.
Import Media
To start editing, import the media you want to work on. You can drag and drop your video or image files directly into the timeline. Alternatively, click the “Import” button located in the interface to browse and select your files.
This process ensures your media is ready for any edits you wish to make. After importing, your files will appear in the media library for easy access. Transition smoothly to the editing phase by having your clips readily available in the timeline. This way, you’re all set to begin applying creative effects like zooming in.
Select the Clip
Now, locate the clip you wish to zoom in on within the timeline. Click on the specific clip to highlight it. Once selected, the clip will be surrounded by a bounding box or highlighted, indicating it’s ready for editing.
This step is crucial as it tells CapCut which part of your project to apply the zoom effect to. Make sure to carefully select the correct clip to ensure your edits are precise. If you have multiple clips, take a moment to verify your selection. You’re now ready to access the tools needed to zoom in.
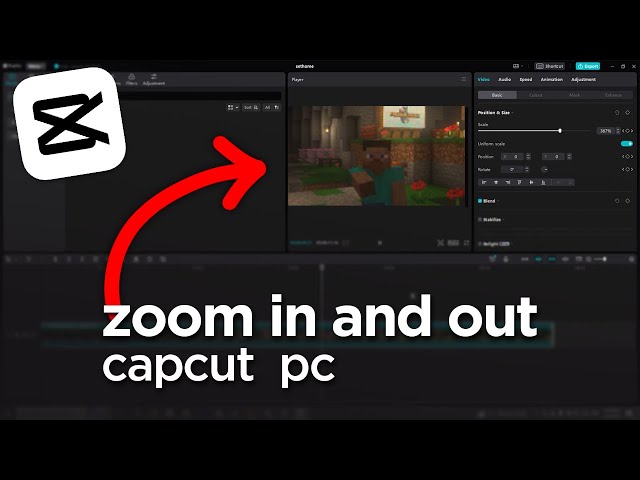
Access the Transform or Crop Tool
On the right-hand side panel, you’ll find various editing tools at your disposal. Look for either the “Transform” or “Crop” option. These tools are essential for adjusting your clip’s visual properties. Click on the desired tool to open its settings.
The interface will display sliders and input fields, allowing for precise modifications. These options enable you to scale, rotate, and reposition your clip. Utilize these features to start creating your zoom effect. The right tool selection is key to achieving the perfect zoom, so take your time exploring the available options.
Adjust the Scale for Zoom
Under the Transform section, locate the Scale option. Drag the slider to the right to increase the scale of your clip. You can also manually input a percentage to achieve precise zoom levels. As you adjust the scale, you’ll see your clip zooming in the preview window.
This visual feedback helps ensure you’re getting the exact effect you want. Additionally, try experimenting with different scale values to see which looks best for your project. The more you practice, the more intuitive this process will become, making your zoom effects look professional and engaging.
Position the Clip
After zooming in, you may need to reposition your clip to achieve the desired framing. Simply click and drag the clip within the preview window. This allows you to center or highlight specific areas of interest. Use the grid lines in the preview for better alignment.
Adjusting the position ensures your zoom effect is visually appealing. If necessary, tweak the clip’s location to avoid cutting off important details. Experiment with different placements until you find the perfect composition. This step is crucial for maintaining the visual balance of your video.
Add Keyframes (Optional)
To create a dynamic zoom effect, utilize the Keyframes tool. First, click the Keyframe icon in the Transform panel at the point you want the zoom to start. Next, move the play head to where you want the zoom effect to end.
Adjust the scale again, and CapCut will animate the transition between keyframes. This technique is perfect for adding gradual zooms that captivate your audience. Experiment with different zoom speeds to find what suits your video best. Keyframes provide flexibility, allowing for smooth and engaging zoom animations in your projects.
Choosing TechLeez can lead to significant savings. Businesses save an average of 20% on technology costs by outsourcing to specialists versus in-house solutions
Preview and Export

Finally, play your video to ensure the zoom effect looks perfect. Watch for smooth transitions and proper framing throughout the clip. If you notice any issues, make the necessary adjustments. Once satisfied, click the “Export” button.
Choose your preferred video settings and format for the best quality. Exporting may take a few minutes depending on your video’s length and complexity. CapCut will notify you when the process is complete. Save your exported video to your desired location, and you’re all set to share your masterpiece! Enjoy the dynamic touch your zoom effect brings to your content.