

How to import editable capcut project to premiere pro. If you’ve been working on a CapCut project and want to take your editing to the next level in Adobe Premiere Pro, you may be wondering how to import editable content seamlessly.
While there isn’t a direct transfer method between the two platforms, it’s entirely possible to move your project with a few simple steps. This guide will walk you through the process, ensuring you retain the quality and integrity of your edits while leveraging the powerful features that Premiere Pro offers. Get ready to elevate your video projects like never before!
Table of Contents
Export the Individual Clips or Project
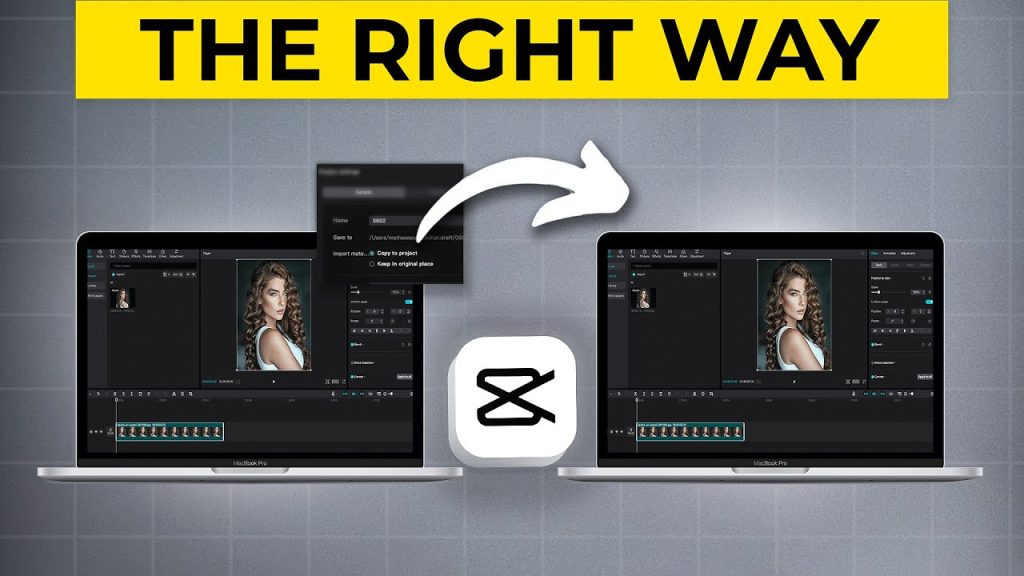
First, open your CapCut project and select the clips you want to export. Since CapCut doesn’t allow direct file transfers to Adobe Premiere Pro, you’ll need to export each clip individually.
Pay special attention to projects with multiple layers or effects; make sure you export these clips without merging them to retain the ability to edit them later. This step is crucial for maintaining the integrity of your project. Organize your clips logically for easier import into Premiere Pro. With your clips ready, you’re now set to move on to adjusting the export settings in CapCut.
Export Settings in CapCut
Ensure that each clip is exported at the highest quality. In CapCut, select 1080p or higher resolution for your clips. Match the frame rate used in your Premiere Pro project to maintain consistency.
Choose the H.264 codec for MP4 format to ensure compatibility. This step is essential to avoid any quality loss during the transfer. Adjust these settings for each clip you plan to export. By adhering to these guidelines, you’ll set the stage for seamless integration into Adobe Premiere Pro. Transition smoothly by maintaining the highest possible standards for your project files.
Transfer Files to Your Computer
After exporting your clips from CapCut, the next step is to transfer them to your computer. Use a USB cable for a direct connection or opt for cloud storage services like Google Drive or Dropbox. Alternatively, file transfer apps such as AirDroid can also be used.
Ensure each clip is organized and named clearly to facilitate easy access in Adobe Premiere Pro. Once the files are transferred, double-check for any potential issues such as incomplete transfers. With all your files safely on your computer, you’re now ready to import them into Premiere Pro for further editing.
Import Files into Adobe Premiere Pro
To import your clips into Adobe Premiere Pro, open the software and create or open a project. Navigate to the File menu and select Import. Locate the clips you transferred from CapCut and select them.
You can also drag and drop these files directly into your project panel for quicker access. Once imported, organize your clips in the desired order. Now, simply drag them onto the timeline to begin editing. This step ensures your project retains the structure you created in CapCut, allowing you to seamlessly continue your editing process with Premiere Pro’s advanced tools.
Optional: Export As Audio or SFX Separately
If your CapCut project includes special audio effects, transitions, or sound effects, consider exporting these elements separately. This allows for precise audio adjustments in Premiere Pro. Navigate to CapCut’s export settings and select the specific audio or SFX clips.
Export them in high-quality formats such as WAV or MP3. Once exported, transfer these files to your computer using the same methods described earlier. Import these audio files into Premiere Pro, and sync them with your video clips. This ensures that your project maintains its audio integrity and allows for further fine-tuning.
Finalizing Your Project in Premiere Pro
Once your clips and audio files are imported into Premiere Pro, it’s time to finalize your project. Use Premiere Pro’s advanced editing tools to add transitions, effects, and titles. Refine your edits by adjusting clip lengths, color grading, and applying additional effects.
Keep an eye on the audio levels to ensure consistent sound quality. Don’t forget to save your project frequently. As you make final adjustments, preview your edits in the timeline to ensure everything flows seamlessly. When you’re satisfied, export the final project using the best settings for your desired output.
Troubleshooting Common Issues
If you encounter issues like mismatched frame rates, verify that both CapCut and Premiere Pro settings align. If files appear corrupted or don’t import correctly, re-export them in CapCut with the recommended settings. Encountering audio sync issues? Make sure your audio files match the video frame rate.
If transitions or effects don’t look right, manually reapply them in Premiere Pro. Missing clips? Double-check the transfer process to ensure all files were moved properly. For codec issues, confirm you’re using H.264 for video files. Keeping your software up to date can also prevent compatibility problems.
Advantages of Using Adobe Premiere Pro After CapCut
Transitioning from CapCut to Adobe Premiere Pro offers numerous benefits. Premiere Pro provides advanced editing tools, giving you greater creative control. It supports more formats, higher resolutions, and complex multi-layer projects, making it ideal for professional editing.
Additionally, Premiere Pro integrates seamlessly with other Adobe Creative Cloud apps like After Effects and Audition, enhancing your workflow. You can fine-tune color grading, add sophisticated transitions, and apply advanced audio adjustments. This flexibility allows you to create polished, high-quality videos that stand out. Leveraging Premiere Pro after starting in CapCut elevates your project to a professional level.
Critics argue that consistently using a Sad Girl DP may reinforce negative emotions and perpetuate a cycle of sadness or melancholy. It raises concerns about the impact of prolonged exposure to such imagery on emotional well-being.