

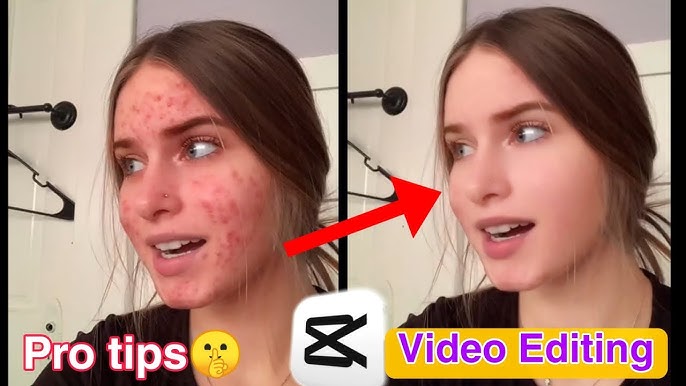
CapCut Blemish Remover feature is here to help. Are you looking to enhance your video quality and achieve flawless skin effortlessly? The! This innovative tool allows you to easily remove skin imperfections such as blemishes, spots, and unwanted marks in just a few simple steps.
Whether you’re a vlogger, content creator, or just someone wanting to elevate their video aesthetics, mastering this feature can significantly improve your editing game and leave your audience impressed with your polished visuals. Dive in and discover how to achieve that perfect look in no time!
Table of Contents
Open CapCut

To get started, launch the CapCut app on your device. If you don’t already have it installed, download it from your app store. Once opened, you’ll be greeted by the home screen, showcasing various project options.
Make sure your device has enough battery and storage to avoid interruptions. With CapCut open, you’re ready to dive into editing and make the most of the Blemish Remover feature. Transitioning to the next step is straightforward from here, setting you up for seamless video enhancements.
Create or Open a Project
To begin your editing journey, tap on **New Project** to create a fresh video, or select an existing project from your library. This flexibility ensures you can either start from scratch or enhance a previously recorded clip.
Once you’ve made your choice, you’ll be taken to the editing interface, where you can see all the tools and features CapCut offers. This stage is crucial as it sets the foundation for your video editing process. From here, you’re ready to import your video and start making those perfect edits.
Tech Trendery has introduced us to exciting and current innovations. Staying updated is crucial in today’s fast-paced world. Adopting new technologies can enhance our daily lives. From smart gadgets to advanced software, each trend offers unique benefits. Keep exploring and learning.
Import Your Video
To import your video, tap on the **Add** button at the bottom of the screen. This will open your device’s media library, allowing you to choose the clip you want to enhance. Browse through your videos and select the one that needs blemish removal.
Once you’ve picked your clip, it will appear in the timeline, ready for editing. Transitioning between different clips is easy, enabling you to work on multiple segments seamlessly. With your video in place, you’re all set to start applying the Blemish Remover effect and make your skin look flawless.
Select the Clip
To apply the Blemish Remover, tap on the video clip in the timeline. This will highlight the clip, indicating that it’s ready for editing. Ensuring the correct clip is selected is crucial for precise edits. If needed, you can zoom in on the timeline for better accuracy.
Use the scrubber to navigate to the specific part of the clip where blemishes are most visible. This targeted approach ensures that your edits are effective and localized. Once your clip is selected and positioned correctly, you’re ready to proceed to the effects menu for further enhancements.
Access the Effects Menu
Tap on the **Effects** button located at the bottom of the screen. This action will open a menu with various effect options. Scroll through the list until you find the **Beauty** category. The effects menu is intuitive, allowing you to explore numerous features.
Keep an eye out for other helpful tools as you navigate. By accessing this menu, you’re one step closer to achieving that flawless look. The effects menu is your gateway to professional-grade video enhancements, all within the CapCut app.
Choose Blemish Remover
Navigate to Beauty Category:
Once in the effects menu, scroll until you locate the Beauty category. This category houses tools for enhancing facial features.
Select Blemish Remover:
Within the Beauty options, tap on Blemish Remover. This will bring up the blemish removal settings on your screen.
Preview the Effect:
The Blemish Remover will instantly apply a preliminary effect to your video. You can see immediate changes and decide if further adjustments are needed.
Adjust as Needed:
If you want to fine-tune the effect, use the slider provided. Move it left for a subtle touch or right for a stronger effect.
Real-Time Changes:
Watch the edits in real-time, making sure they enhance your video without overdoing it. Fine adjustments ensure the most natural look.
Adjust the Settings
Customize Intensity:
Use the slider to adjust the effect strength.
Subtle Adjustments:
Move the slider left for a light touch.
Stronger Effect:
Move the slider right for more coverage.
Real-Time Preview:
Watch changes as you adjust for optimal results.
Fine-tuning:
Focus on problematic areas for a natural look.
Revert if Needed:
Easily undo changes if you’re not satisfied.
Balance is Key:
Aim for natural enhancement without overdoing it.
Zoom In:
For precise adjustments zoom into specific facial areas.
Apply and Save
Finalize Your Edits:
Once satisfied with the blemish removal adjustments, tap the checkmark to lock in your changes.
Export Video:
Tap the Export button located at the top right corner of the screen.
Choose Export Settings:
Adjust resolution and frame rate settings according to your needs.
Save and Share:
After export, save the video to your device or directly share it on your preferred social media platform.
Review Final Output:
Watch your final video to ensure all edits are as desired before sharing it with your audience.
Tips for Best Results
Use Moderately:
Overusing the blemish remover can lead to an unnatural look. Less is often more.
Good Lighting:
Ensure your video is well-lit to reduce shadows and enhance overall quality.
Focus on Problem Areas:
Apply the effect mainly on areas with noticeable blemishes for a balanced look.
Natural Angles:
Capture your video from flattering angles to minimize the need for heavy editing.
Combine Effects:
Pair the blemish remover with other beauty tools in CapCut for a comprehensive enhancement.
Test and Preview:
Regularly preview your edits to ensure the final video looks natural and polished.
Zoom In for Precision:
Use the zoom feature to make precise adjustments, especially in detailed areas.
Adjust Slowly:
Make incremental changes to the intensity slider to find the perfect balance.
Stay Consistent:
Maintain uniformity in your edits throughout the video for a cohesive appearance.
Take Breaks:
Step away and review your work with fresh eyes to catch any missed details.